Showing posts with label handmade gifts. Show all posts

February 17, 2012

Super Cute and Easy Decorative Paper Clips

Don't we all love cute little things or am I the only one with a button obsession? Man I can't stand these tiny hearts and flowers! They are to die-for... (see, I really need a girl next!!) I want to put them on felt flowers and bows, dress straps, and shoes! Can you imagine little girl shoes with flower buttons? Ok anyway, moving on...
I combined my button fetish with a practical item I ordered from Everything Ribbons- my favorite go-to supply shop on etsy.
I needed a cute and functional paper clip to clip my business card to their sales sheet and include in my orders.
I think these turned out great!! They were so easy to make, I just hot-glued buttons on top of buttons to the paper clip pad. WAhLAA!!
Well, this is about all I've been doing in the creative department, but I do have a clean house! I feel like I go in waves with creativity (and during those times my house is trashed!) and periods where I have no creative brain-waves! Lately I've been working on organizing our playroom which I'm really happy with!!
I post more detailed ideas on playroom organization soon! One more shelf unit to tackle!
{Linking up here}


November 15, 2011

Lovin' these Felt Flowers!

Every once in awhile I get in a major flower making mood! That happened tonight as I started cutting out felt and tulle and trying to decide what to do with the flower shapes.
I remembered the box fold felt flower I featured in our fabulous fabric flowers post this spring! I added a tulle flower to every layer of felt. I love the soft but bold effect of the contrasting tulle color! Then I used embroidery thread to sew in the rhinestone, pearl or button.
fun fall colors!
Winter wonderland- snow and ice?!
Christmas colors!
These pictures seriously don't do justice to how cute these turned out. They'd be darling on a baby headband or even a bracelet! Now available in my shop- these would make great birthday or Christmas gifts, and a great accessory to any outfit!


July 28, 2011

Jewelry Making {Craft Camp} Tutorials

Last summer I taught a few Art Camps in Texas. This summer I added a new class, a Jewelry Making Craft Camp. Today was our final day, and we had a blast! I want to share with you the projects we created and how to do them:

The first thing we made was clay flowers for earrings and bobby pins. I have to tell you how excited I am about these! I purchased these molds from MoldMuse on etsy a couple months ago, hoping to master the resin process.
I did lots of research and bought the Castin'Craft line of epoxy/resin products and dyes, and I just couldn't get it right. Even after following directions on mixing and dye proportion, my flowers would cure tacky and had bubbles in most of the flower tips. So I decided to try the less expensive and much easier option, Sculpey Clay. I am SO happy with how they turned out! And the most reasonable technique for 9-12 year old girls.
Clay Flower Cabochons:
Step 1: Fill Sculpey Clay in the cavities of the molds. We added bobby pins (with pad), earring studs, and even the back of a cover button (pad and loop) for a hair tie. Just push the flat part into the clay so it bakes right in.
Step #2: Bake at 275 degrees for 15-20 minutes.
Step #3: Cool and pop clay out of the mold--another thing I love about these molds is they pop right out, even my unattractive looking resin flowers popped out easily.
Step #4: Decorate some scrapbook paper to display new jewelry and accessories. We used 3X3 inch squares, with small hole punches for the bobby pin cards and 2 inch scallops for the earring cards. I got out my stamps for the girls to stamp their names, or fun designs:

The ring pad didn't sit well in the mold, so we baked it without and glued it with some E600 after the clay cooled. A scallop punch and slit punch for the rings turned out great.
One of the girls said her hair was too thin to hold a bobby pin, so I improvised and used the back piece of a cover button (the flat pad and loop) to set in the mold. Then we looped a hair tie through it and it made a beautiful hair tie!
I think these make great gifts and they were SO easy to make!

The next project we did was the glass tile necklaces. You can purchase a kit to make them HERE at Willow Run Crafts on Etsy, these were easy enough for the girls and they turned out so professional looking. They decorated tins to match- using circle punches for the bottom and top of the tin and stamps to embellish.
The next day, we focused on fabric jewelry. The first project we did was decoupaged beads. We took large wooden beads (I found a huge tub from Michaels for $5 that worked great) and covered them with mod podge and fabric squares. I think this was the hardest project for them, you really have to be able to manage the fabric carefully. Here's the tutorial:
Fabric Covered Bead Bracelet:
Step #1: Paint Mod Podge on the bead and cover with about a 2 inch square of fabric.
Step #2: Twist the ends like you would a hard candy wrapper. Hold for a few seconds for glue to set.
Step #3: Cut off excess fabric and using a meat skewer or pointed dowell, poke fabric inside the hole of the bead. I told the girls if you can't see through the bead, it won't work, so many times they had to pull out the fabric, cut more and try again.
Step #4: Then using hemp string with a clasp tied to one end, string beads with a double knot in between each one. Then tie off with a clasp to close.
They turned out so cute, are so unique and pretty easy to make!
The last thing we did were these fabric flower headbands:
Basically you wrap the plastic headband in grosgrain ribbon, using a glue gun to adhere the ribbon on. Create the flower using THIS tutorial I created for the tote bags. Instead of finishing it on a pin, glue the flower to the headband and knot the tail and other end around the headband. Easy Peasy!

I'm excited for my next two camps: Messy Fun Toddler Camp (most projects from here!) and an Eric Carle Camp, inspired by Very Hungry Caterpillar, we will be doing lots of art projects with Caterpillars & Butterflies- collage, relief stamping, 3-D projects and more! I will post pictures after the camps.

Also, when I get 5 more followers (200 total), I will be revealing another one of my sewing patterns for all my readers, so if you are new to Kirstikoo Handmade Gifts, follow me and you won't be disappointed. Go HERE to vote on your favorite pattern for the reveal.
{Linking up with:}
Craft Junkie Too Friend Photobucket DIY under $5

http://linesacrossmyface.blogspot.com/search/label/the%20Cure%20for%20the%20Common%20Monday The Girl Creative

July 25, 2011

Decorated Dollar Store Tote Bags

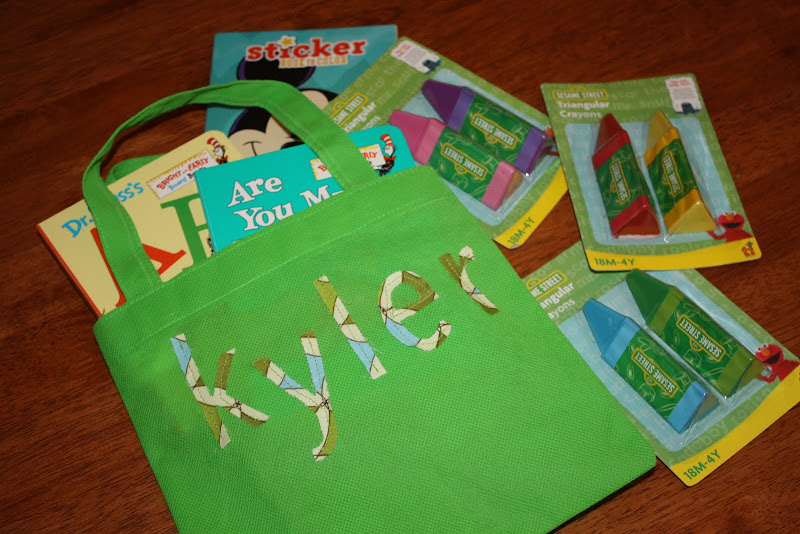
We had 2 birthday parties this weekend, and I needed an inexpensive but super cute gift idea. I think they turned out great!! One of my favorite gifts to give is a personalized bag for church or the doctors office-- what little kid doesn't LOVE carrying around their very own bag? Mine do.
Usually I love to use Hobby Lobby's Canvas Bags- 4 in a pack for $6.99 and if you use a 40% off coupon, it's an even better deal! But I don't have a Hobby Lobby near me anymore :( and JoAnn's didn't have any small bags. Here are a couple bags I made last year with them:
I always fill them with $1 activity prizes from Target (love their dollar section!!) I actually grab things from there before I have a gift to plan and save them in a small box in my craft room. They have come in handy many a times!

So, since I didn't have my usual Hobby Lobby totes on hand, I remembered seeing these darling tote bags from Dollar Tree, $1 for 2!
I used my trusty Big Shot with the Sizzix alphabet set to cut out the letters (if you don't have a diecut machine, print off some large letters from word and cut them out-- that works great, it's just a bit more work- which is why I used to do initials instead of a whole name)
and then sew the letters on. If I were to do this again, I'd get some fabric glue and tack them down first. It's a little tricky to maneuver the bag around the sewing machine, but definitely remove the extension to your machine so you can get inside the bag and sew the letters on without sewing the bag shut (cuz that might defeat the purpose!!)
add a fun embellishment for a girlie bag, stuff with some fun activity prizes- books, stickers, crayons, stationary, pens, markers, board books, pez candies...
I filled this one with our favorite Dr. Seuss board books, some toddler crayons and a Mickey Mouse activity book.
...and you've got yourself the perfect personalized quiet bag gift!!
{Linking up with:}
Photobucket A Crafty Soiree Craft Junkie Too Friend
DIY under $5